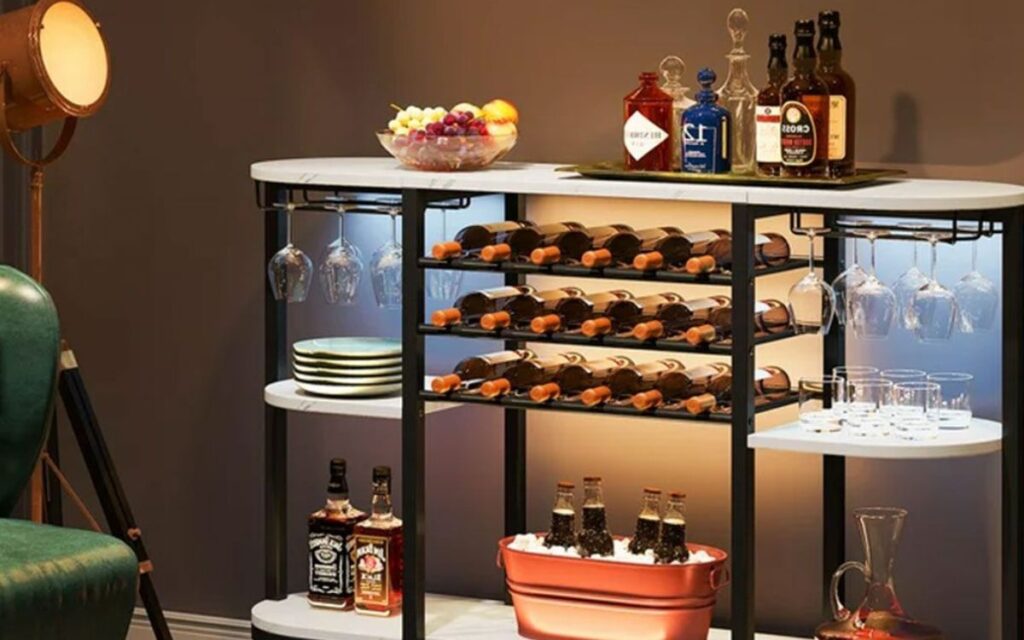
How to Build a Mini Bar Cabinet – a fun and rewarding DIY project that not only enhances your woodworking skills but adds a touch of elegance and convenience to your home. Mini bar cabinets are compact, stylish, and provide a perfect place for storing your favorite beverages and cocktail accessories.
Creating your own mini bar cabinet allows for personal customization, tailoring it to meet your specific needs and preferences. Whether you have a small apartment or a spacious home, a mini bar cabinet can be a functional and aesthetic addition, elevating your interior design.
Over the course of this guide, you will learn the step-by-step process of building your mini bar cabinet, from choosing the right materials to applying the finishing touches. This project can be a great weekend endeavor, promising a delightful end result – your very own mini bar cabinet! Get ready to embark on this exciting DIY journey.
How To Build A Mini Bar Cabinet
Let’s start our project by considering the design and dimensions of your mini bar cabinet. Depending on your available space and style preference, you can opt for a sleek modern design or a classic vintage look. The size can be adjusted to your needs – a compact, space-saving solution for smaller apartments or a larger, statement piece for spacious homes.
Tools and Materials
Before embarking on the construction of your mini bar cabinet, it’s important to ensure you have all the necessary tools and materials at hand. Some essential tools you’ll need include a reliable circular saw to achieve precise cuts, a versatile drill for assembling components, a sander for achieving a smooth finish, and a trusty tape measure to ensure accurate dimensions.
In terms of materials, you’ll require sturdy plywood that can withstand the test of time, durable screws to securely fasten the various parts together, and paint or stain to add a touch of personalization and protection to your mini bar cabinet. Additionally, don’t forget to select your preferred hardware for the doors and drawers, as this can greatly enhance both the functionality and aesthetics of your creation.
By diligently gathering these tools and materials, you’ll be well-prepared to embark on the exciting journey of constructing your very own mini bar cabinet, tailored to your unique taste and style. Cheers to your upcoming DIY adventure!
Designing Your Mini Bar Cabinet
The next step in creating your mini bar cabinet is to sketch the design, allowing your creativity to shine. However, it’s important to consider the practicality and functionality of your design. Think about the size and type of beverages you plan to store. Will you primarily be storing wine bottles, or do you also need space for taller liquor bottles?
Additionally, consider whether you require a drawer for organizing cocktail accessories. Taking these details into account will ensure that your mini bar cabinet is both visually appealing and highly functional.
Cutting the Wood
To bring your design to life, start by carefully measuring and marking the plywood according to your specifications. With precision and caution, use a circular saw to expertly cut the plywood into the different components needed for your mini bar cabinet.
These components include the top, bottom, sides, back, shelves, and door panels. By paying attention to every detail during this process, you’ll ensure the creation of a high-quality and functional piece of furniture that perfectly suits your needs.
Assembling the Cabinet
Now, it’s time to begin the assembly process. Start by gathering your drill and screws, which will be used to securely connect the various pieces together. Begin with the frame, consisting of the top, bottom, and sides, ensuring a sturdy foundation for the rest of the assembly.
Once the frame is in place, proceed to install the back panel, providing additional support and stability. With the back panel securely attached, it’s time to focus on the interior shelves, carefully placing them to optimize storage space and functionality.
If your design includes a drawer, this is the perfect moment to assemble and install it, adding a convenient storage solution to your creation. Take your time during this step, ensuring proper alignment and smooth operation of the drawer.
By following these detailed steps, you’ll be well on your way to completing the assembly and creating a functional and attractive piece. Enjoy the process and the satisfaction of a job well done!
Finishing Touches
Finally, attach the doors and apply your choice of paint or stain. If you opt for a natural look, consider applying a clear polyurethane coat for protection. Once everything is dry, attach the hardware. And voila! Your DIY mini bar cabinet is ready to stock up and show off.
Remember, this guide is a starting point. Feel free to modify any steps to suit your unique style and needs. Happy building!
See more: Are Cabinets Good To Build A Bar?
FAQs
Maintaining your mini bar cabinet will ensure its longevity and keep it looking its best. Regular dusting, avoiding moisture, and handling the cabinet with care can help preserve your DIY creation for years to come.
How often should I clean my mini bar cabinet?
Ideally, you should dust your mini bar cabinet at least once a week. Dust can build up quickly and can dull the appearance of your cabinet. Use a soft, dry cloth to gently remove dust particles.
Also, immediately clean up any spills to prevent stains or damage to the wood. A deeper clean with a suitable wood cleaner can be done every few months to help maintain the shine and luster of your cabinet. Make sure to avoid using any harsh chemicals that could potentially damage the finish.
How can I handle minor scratches or dents on the cabinet?
Even with the best care, your mini bar cabinet may acquire minor scratches or dents over time. If you’ve used a stain or paint on your cabinet, you can lightly sand the affected area and apply a new layer of the same finish. For deeper scratches or dents, you may need to fill them with a wood filler that matches the color of your cabinet before applying the finish.
Can I place my mini bar cabinet in a humid area?
It’s best to avoid placing your mini bar cabinet in a humid area. Wood tends to absorb moisture, which can lead to warping or swelling over time. If your cabinet is in a room with high humidity levels, you may want to consider using a dehumidifier to reduce the moisture in the air. Additionally, avoid placing your cabinet near heat sources such as radiators, as they can cause the wood to dry out and crack.
How should I handle the hardware on my mini bar cabinet?
The hardware on your mini bar cabinet, such as handles or knobs, should be cleaned carefully to prevent damage. Avoid using harsh cleaning agents as they might tarnish or discolor the metal. Instead, use a mild soap solution and a soft cloth to clean the hardware. If the handles or knobs become loose over time, you can tighten them with a screwdriver. Always handle the hardware gently to ensure its longevity.
Final Thought
Building a mini bar cabinet is a rewarding experience that allows you to add a personal touch to your home. This custom furniture piece not only serves as a functional storage space but also adds aesthetic value to your interior design. Remember, the key to a successful project lies in careful planning, accurate measurements, and precise execution.
Given the detailed instructions provided, even a novice can undertake this DIY project. Don’t be afraid to make adjustments to the design as you go. Adding your unique flare will make the cabinet truly yours. Enjoy each step of the journey, from the initial design to the final coat of paint.
Maintaining your mini bar cabinet is an essential part of the process. Regular cleaning and timely repairs can significantly extend its lifespan. Choosing the right placement for your cabinet can also prevent any potential damage and help maintain its condition.
To sum it up, building your mini bar cabinet is more than just a DIY project. It’s a journey of creation and self-expression that culminates in a functional and beautiful addition to your home. Embrace the process, and take pride in your accomplishment, knowing that you’ve created something truly unique.