- What Size Mini Fridge For A Kegerator?
- What Do You Need To Make A Kegerator Out Of A Mini Fridge?
- How To Make A Kegerator Out Of A Mini Fridge – Step By Step
- Choose A Fridge That Works
- Find Mini Fridge Kegerator Conversion Kits
- Remove Your Fridge
- Remove the Top Piece of the Fridge
- Install The Draft Arm
- Install The Faucet
- Install The Drip Tray
- Connect The Beer Line
- Fill The CO2 Tank And Attach The Regulatory – Turn on the CO2
- Assemble The Top Piece Of The Kegerator
- Turn On The Fridge And Test The Kegerator
- Can I Drill A Hole In My Fridge?
- Can You Turn A Chest Freezer Into A Kegerator? Step By Step Guide
- Other Ideas For Using A Mini Fridge Kegerator
- FAQs
- Can You Run A Tap Through The Door On A Mini Fridge?
- How much does it cost to turn a mini fridge into a kegerator?
- How do you lock a mini fridge?
- Will a 5-gallon keg fit in a mini fridge?
- What is the best way to clean a mini fridge?
- How often should you clean a mini fridge?
- What can I use instead of a mini fridge?
- Can I use a mini fridge for other things besides beer?
- What size fridge do you need for a keg?
- What should PSI CO2 be for a kegerator?
- How do I prevent my mini fridge from rusting?
- Conclusion
How To Make A Kegerator Out Of A Mini Fridge?
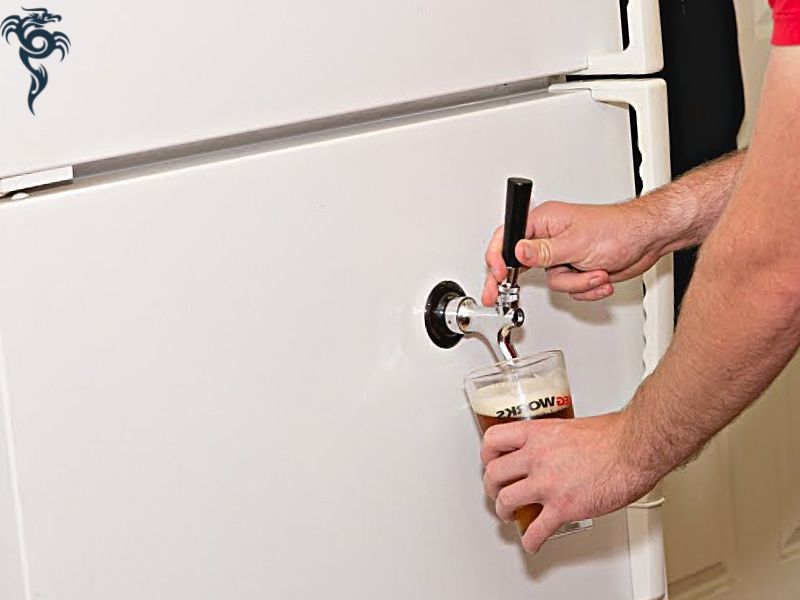
Have you ever been to a party or barbecue and wished you had your keg to dispense beer? Kegerator is a great device for storing and dispensing beer, helping to keep the taste of beer for weeks or even months if stored properly. However, their price is quite high, but they will save money in the long run. Have you ever wanted to have your kegerator, but didn’t want to spend the money? Or maybe you just don’t have enough space for a full-sized refrigerator? Well, I’m here to show you How To Make A Kegerator Out Of A Mini Fridge! If you can’t afford it and you have a mini fridge you don’t use anymore (a working fridge), you can turn it into your own kegerator. It looks complicated at first, but with a little knowledge (refer to the internet or ask someone knowledgeable about it) plus a few simple techniques, you have created a perfect homemade kegerator. Catering to your beer needs, creating cool and delicious beers for you, or small parties with family and friends. This is a great project for those who are looking for a fun weekend project, and it will save you some money in the long run.
In this blog post, we will show you How To Make A Kegerator Out Of A Mini Refrigerator in just a few simple steps. So, whether you’re looking to impress your friends or simply want to have cold beer on tap at all times, keep reading for instructions on how to make your very own kegerator.
What Size Mini Fridge For A Kegerator?
The size of the mini-fridge is important when you want to use it as a kegerator. If you want to use a standard 5-gallon keg, then you need at least a 1.7 cubic foot fridge. A larger fridge will work just as well but remember that you are limited by the space in your home for where you can put your kegerator. For example, if you want to put your kegerator in your basement, then you may need a larger fridge so that it can hold all of the beer cans and bottles that you plan on storing in it. Additionally, if you plan on storing more than one keg in your kegerator, then you will need a larger fridge. The general rule of thumb is that you need at least 1 cubic foot of space for every gallon of beer that you plan on storing in your kegerator.
What Do You Need To Make A Kegerator Out Of A Mini Fridge?
Assuming that you have already chosen the perfect fridge for your kegerator, now it’s time to get started on the conversion process. This project will require some tools and materials that you may not have around the house, so be sure to gather everything before you begin.
Tools & Materials Needed:
- A mini fridge
- A 5-gallon Cornelius-style keg (or A keg of your favorite beer
- the size that will fit in your fridge)
- A CO2 tank and regulator
- Beer lines and fittings
- A draft arm and faucet
- A drip tray
- A keg coupler
- Drill
- Tape measure
- Marker
- Screwdriver
- Rubber mallet
- Taps
- Shank assemblies
How To Make A Kegerator Out Of A Mini Fridge – Step By Step
Step-By-Step Guide To Transform A Mini Fridge Into A Kegerator
Choose A Fridge That Works
The first step in this process is to choose a fridge that will work for you. There are a few things that you need to take into consideration when choosing a fridge for your kegerator. The first is the size of the fridge. You need to make sure that the fridge is big enough to hold all of the beer that you plan on storing in it. Additionally, you need to make sure that the fridge has enough space for the draft arm and faucet.
Find Mini Fridge Kegerator Conversion Kits
Next, you will need to find a mini fridge kegerator conversion kit. These kits come with everything that you need to convert your fridge into a kegerator. The refrigerator-to-kegerator converter includes the following:
- Serving tower (one or two faucet designs)
- CO2 tank weighs 5 pounds
- Regulator (to regulate pressure)
- Beer line
- Airway
- At least one disconnect
- Snake
For service towers, for household use, there is no need to use two faucets, but only one faucet.
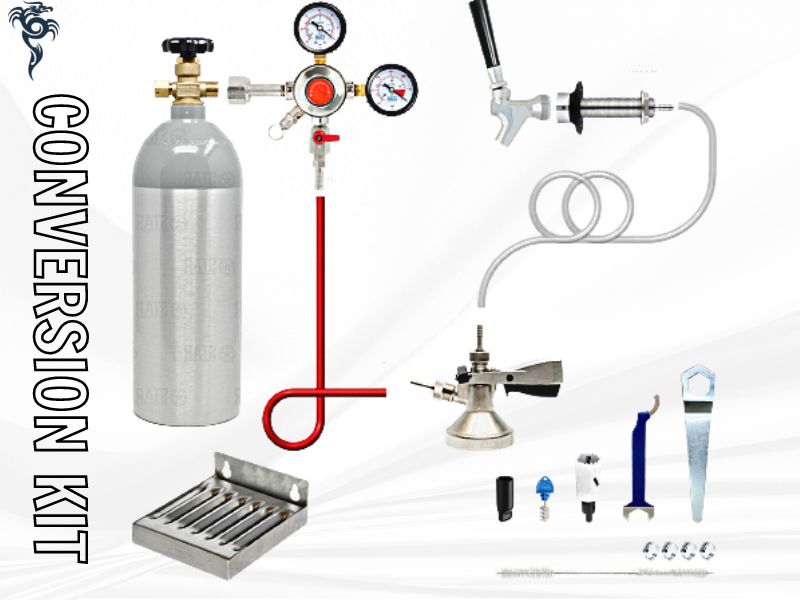
Normally it will cost about $200 for these kits, if you want an adapter with a more luxurious design and quality, then fall into the $350 range for it.
Purchase A Keg (Or Two)
Of course, you cannot have a kegerator without a keg (or two). For those who are not familiar with kegs, they are large metal containers that hold beer. Kegs come in a variety of sizes, but the most common size is the half-barrel keg. This is the size that you will most likely find in your local grocery or liquor store. If you plan on storing more than one keg in your fridge, then you will need to purchase a keg collar. This is a device that allows you to stack two kegs on top of each other in the fridge.
Remove Your Fridge
Some people like to remove their fridge’s doors when they’re making a kegerator out of it. This is entirely up to you and is not necessary for the conversion process.
Remove the shelves from the fridge: The next step is to remove the shelves from the fridge. This will give you more space to work with and make it easier to install the draft arm and faucet.
Some mini fridges might have hardware bolts fastened into their sides that get tricky because you either need to leave them in place while hoping for a fit between your fridge-keg combo or you need to unscrew them which might damage or strip the threading.
Remove the Top Piece of the Fridge
The next step is to remove the top piece of the fridge. This is the piece that covers the coils on the back of the fridge. In order to remove this piece, you will need to unscrew the screws that are holding it in place. Once you have removed the screws, you will be able to lift off the top piece.
Install The Draft Arm
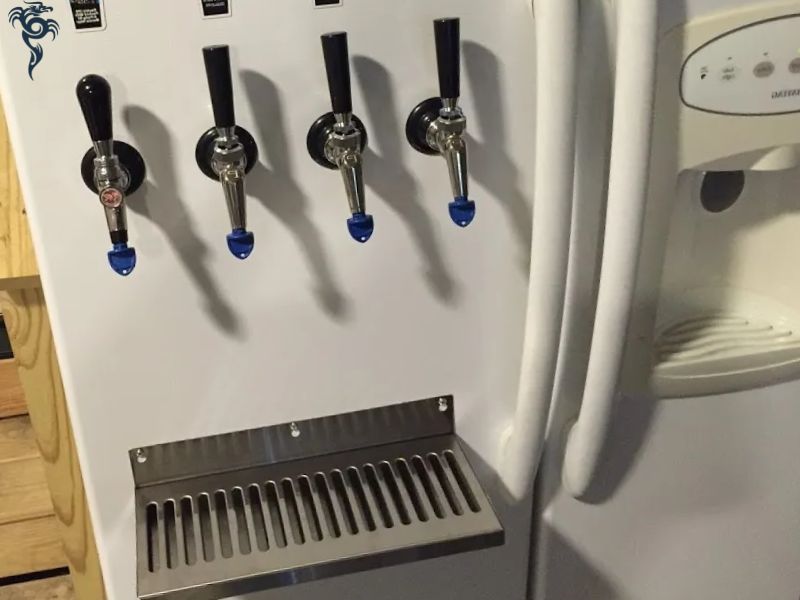
Now, it is time to install the draft arm. The draft arm is what allows you to pour beer from the keg. In order to install the draft arm, you will need to drill a hole in the front of the fridge. The size of this hole will depend on the size of the draft arm that you are using.
Once you have drilled the hole, you will need to insert the draft arm into the hole. Be sure to use a washer and nut on the inside of the fridge to secure the draft arm in place.
Install The Faucet
The next step is to install the faucet. The faucet is what you will use to pour the beer. In order to install the faucet, you will need to drill a hole in the top of the fridge. The size of this hole will depend on the size of the faucet that you are using.
Once you have drilled the hole, you will need to insert the faucet into the hole. Be sure to use a washer and nut on the inside of the fridge to secure the faucet in place.
Install The Drip Tray
The next step is to install the drip tray. The drip tray is what catches the beer that drips from the faucet when you are pouring a beer. In order to install the drip tray, you will need to drill four holes in the front of the fridge. These holes will be used to secure the drip tray to the fridge.
Once you have drilled the holes, you will need to insert the screws into the holes and screw them into place. Be sure to use washers on the inside of the fridge to prevent the screws from stripping the holes.
Connect The Beer Line
The next step is to connect the beer line to the keg. In order to do this, you will need to use a coupler. The coupler has two parts: the body and the probe. The body of the coupler is what connects to the keg and the probe is what connects to the beer line.
In order to connect the coupler to the keg, you will need to unscrew the valve on top of the keg. Once you have unscrewed the valve, you will be able to insert the body of the coupler into the valve.
In order to connect the probe of the coupler to the beer line, you will need to insert the barb into the end of the beer line. Once you have inserted the barb, you will need to use a clamp to secure it in place.
Now, you will need to connect the other end of the beer line to the faucet. In order to do this, you will need to insert the barb into the end of the beer line. Once you have inserted the barb, you will need to use a clamp to secure it in place.
Fill The CO2 Tank And Attach The Regulatory – Turn on the CO2
Now, you will need to fill your CO2 tank and then attach the regulator. Be sure to start with low pressure so that you do not blow out your beer lines.
The next step is to turn on the CO2. The CO2 is what provides the pressure to dispense the beer from the keg. In order to turn on the CO2, you will need to open the valve on the tank. Once you have opened the valve, you will hear a hissing sound as the CO2 starts to flow into the keg.
Now, you will need to screw the regulator onto the tank. The regulator is what controls the flow of CO2 into the keg. In order to screw the regulator onto the tank, you will need to use a wrench.
Once you have screwed the regulator onto the tank, you will need to turn on the gas. In order to turn on the gas, you will need to rotate the knob on the regulator clockwise.
Now, you will need to adjust the pressure. The pressure should be set at 12 psi. In order to adjust the pressure, you will need to rotate the knob on the regulator counterclockwise.
Once you have adjusted the pressure, you will need to open the valve on the keg. In order to open the valve, you will need to use a wrench. Be sure to open the valve slowly at first so that the pressure doesn’t build up too quickly.
Now, you’re reading “How to Make a Kegerator Out of a Mini Fridge?” of Phoenix Landing Bar. Keep reading!
Assemble The Top Piece Of The Kegerator
Now, you will need to assemble the top piece of the kegerator. In order to do this, you will need to insert the four legs into the holes in the top of the fridge. Once you have inserted the legs, you will need to use a wrench to tighten them in place.
Now, you will need to attach the lid to the top of the fridge. In order to attach the lid, you will need to use screws. Be sure to use washers on the inside of the fridge to prevent the screws from stripping the holes.
Now, you will need to attach the handles to the lid. In order to attach the handles, you will need to use screws. Be sure to use washers on the inside of the fridge to prevent the screws from stripping the holes.
Turn On The Fridge And Test The Kegerator
The next step is to turn on the fridge and test the kegerator. Be sure to let the fridge run for 24 hours before you test the kegerator.
In order to test the kegerator, you will need to pour a glass of beer. If the beer is dispensed correctly, then your kegerator is working properly.
If you have any questions or concerns, be sure to consult with a professional before using your kegerator.
Enjoy Your Kegerator!
You have now successfully made a kegerator out of a mini fridge. Be sure to enjoy your keg responsibly!
Instructions Summary:
1. Start by cleaning out your mini fridge and removing any shelves that are inside of it. You want to make sure that the inside of the fridge is clean and dry before you begin so that your beer does not spoil.
2. Next, you will need to drill a hole in the back of the fridge for the CO2 line. The size of the hole will depend on the fittings that you are using for your CO2 line. It is important to make sure that the hole is big enough so that the fittings can be inserted into it but not so big that they are loose.
3. Once you have drilled the hole, insert the CO2 line into it and secure it with the fittings. Make sure that the line is tight so that there are no leaks.
4. Now, you will need to drill two more holes in the back of the fridge. These holes will be for the beer lines. The size of these holes will depend on the fittings that you are using for your beer lines. It is important to make sure that the holes are big enough so that the fittings can be inserted into them but not so big that they are loose.
5. Next, you will need to attach the beer lines to the keg coupler and then insert them into the holes that you just drilled. Be sure to attach the lines before inserting them into the holes so that you do not have to reach into the fridge to do so.
6. Once the lines are in place, you will need to attach the draft arm to the faucet and then screw it into place on the front of the fridge.
7. Finally, you will need to install the drip tray underneath the draft arm. You can either drill holes in the fridge for the screws or use adhesive to attach it.
8. Once everything is in place, you will need to fill your CO2 tank and then turn on the regulator. Be sure to start with low pressure so that you do not blow out your beer lines.
9. Now, all that is left to do is hook up your keg to the coupler and then let the beer flow!
Enjoy your new kegerator! Enjoy your cold, fresh beer on tap!
Can I Drill A Hole In My Fridge?
If you’re not comfortable drilling a hole in your fridge, there are a few other options available. You can purchase a kegerator conversion kit that includes everything you need to transform your fridge into a draft beer dispenser. These kits usually include a CO2 tank, regulator, beer lines, and all of the necessary fittings. You can also purchase a pre-made tap system that attaches to the outside of your fridge. These systems typically don’t require any drilling, but they may be more expensive than a conversion kit.
Additionally, some manufacturers offer mini-fridges that come with a draft beer dispenser built-in. These units are usually more expensive than a regular mini fridge, but they may be worth the investment if you’re serious about having draft beer at home.
Now, you’re reading “How to Make a Kegerator Out of a Mini Fridge?” of Phoenix Landing Bar. Keep reading!
Can You Turn A Chest Freezer Into A Kegerator? Step By Step Guide
While a chest freezer is not as common as a mini fridge, it can still be used to create a kegerator. The process is similar to that of a mini fridge, but there are a few additional steps that you’ll need to take.
1. Start by removing the lid of the freezer. You’ll then need to remove all of the shelving and any other removable items.
2. Next, you’ll need to find the cooling lines. These are typically located near the back of the freezer.
3. Once you’ve located the cooling lines, you’ll need to drill a hole in the freezer for the CO2 line. The size of the hole will depend on the fittings that you are using for your beer lines. It is important to make sure that the hole is big enough so that the fittings can be inserted into it but not so big that they are loose.
4. After drilling the hole, you’ll need to attach the beer lines to the keg coupler and then insert them into the hole. Be sure to attach the lines before inserting them into the hole so that you do not have to reach into the freezer to do so.
5. Once the line is in place, you’ll need to attach the draft arm to the faucet and then screw it into place on the front of the freezer.
6. Finally, you’ll need to install the drip tray underneath the draft arm. You can either drill holes in the freezer for the screws or use adhesive to attach it.
7. Once everything is in place, you will need to fill your CO2 tank and then turn on the regulator. Be sure to start with low pressure so that you do not blow out your beer lines.
8. Now, all that is left to do is hook up your keg to the coupler and then let the beer flow!
Enjoy your new kegerator! Enjoy your cold, fresh beer on tap!
Other Ideas For Using A Mini Fridge Kegerator
While most people use their mini fridge kegerators to store and dispense beer, there are a number of other uses for them as well. Here are a few ideas:
- Use it to store and dispense the wine.
- Use it to store and dispense soda or other carbonated beverages.
- Use it to store and dispense fruit juices or other non-carbonated beverages.
- Use it as an extra refrigerator for your home bar or man cave.
- Use it to store food and drinks for parties or gatherings.
Besides, a mini fridge kegerator can also be a great addition to your office break room or college dorm room. It’s a great way to have cold, fresh beer on tap anytime you want!
FAQs
Can You Run A Tap Through The Door On A Mini Fridge?
Yes, you can run a tap through the door on a mini fridge. Most mini fridges have a hole in the back that’s used for the power cord. This hole can also be used for your beer lines. If your fridge doesn’t have a hole, you can drill one yourself. Just be sure to use a drill bit that’s slightly smaller than the diameter of your beer lines so that they fit snugly.
Additionally, you’ll want to make sure that the hole is big enough so that the fittings can be inserted into it but not so big that they are loose.
How much does it cost to turn a mini fridge into a kegerator?
The cost of turning a mini fridge into a kegerator will vary depending on the specific model that you have and the features that you want to include. Generally speaking, the average cost is between $200 and $300. This includes the cost of the keg, the CO2 tank and regulator, the draft arm, A drip tray, and A keg coupler. It does not include the cost of labor if you choose to have someone else do the conversion for you. Additionally, it does not include the cost of a beer or other beverages.
How do you lock a mini fridge?
There are a few different ways that you can lock a mini fridge. The most common way is to use a padlock. This will prevent anyone from being able to open the fridge without the key. You can also use a zip tie or other type of tie to keep the fridge closed. Additionally, some models come with built-in locks. These are typically located on the side or back of the fridge and can be activated by a switch or button.
Will a 5-gallon keg fit in a mini fridge?
A 5-gallon keg will not fit in a mini fridge. A standard mini fridge is too small to accommodate a keg. However, there are some models of mini fridges that are designed specifically for storing and dispensing beer. These models are larger than standard mini-fridges and have additional features such as built-in taps and drip trays.
What is the best way to clean a mini fridge?
The best way to clean a mini fridge is to unplug it and remove all the food and items from inside. Next, you’ll need to clean the shelves and interior walls with warm, soapy water. Be sure to rinse the surfaces well afterward. Once the fridge’s inside is clean, you can move on to cleaning the exterior. The best way to do this is with a damp cloth and mild soap. Be sure to avoid using harsh chemicals or abrasive cleaners, as these can damage the finish of the fridge.
Once you’ve cleaned the inside and outside of the fridge, you’ll need to allow it to dry completely before plugging it back in and adding any food or items back inside.
How often should you clean a mini fridge?
You should clean your mini fridge at least once a month. However, if you have pets or children, you may need to clean it more frequently. Additionally, if you notice that the fridge is starting to smell or look dirty, it’s best to clean it as soon as possible.
Now, you’re reading “How to Make a Kegerator Out of a Mini Fridge?” of Phoenix Landing Bar. Keep reading!
What can I use instead of a mini fridge?
If you don’t have a mini fridge, you can use a regular-sized fridge or freezer. However, keep in mind that these appliances are much larger and will take up more space. Additionally, they will use more energy than a mini fridge. If you’re looking for a smaller appliance that uses less energy, you can consider using a chest freezer. These are typically used for storing large amounts of food but can also be used for chilling beverages.
Can I use a mini fridge for other things besides beer?
Yes, you can use a mini fridge for other things besides beer. In fact, many people use them to store wine, soda, or even snacks and food. Just be sure to keep in mind that the fridge will need to be cleaned more frequently if you’re using it for food storage. Additionally, you’ll want to make sure that the food is properly sealed so that it doesn’t spoil.
What size fridge do you need for a keg?
The size fridge you need for a keg will depend on the size of the keg. A standard mini fridge is too small to accommodate a full-size keg. However, there are some models of mini fridges that are designed specifically for storing and dispensing beer. These models are larger than standard mini-fridges and have additional features such as built-in taps and drip trays.
What should PSI CO2 be for a kegerator?
The PSI of CO2 for a kegerator should be between 10-12 PSI. This will ensure that the beer is properly carbonated and dispensed.
How do I prevent my mini fridge from rusting?
You can prevent your mini fridge from rusting by regularly cleaning it and keeping it dry. Additionally, you should avoid storing any acidic foods or beverages inside the fridge, as these can cause corrosion. Finally, if you notice any rust on the fridge, you should immediately remove it with a rust remover.
Conclusion
If you are looking for a fun project to do over the weekend, or you need a kegerator and don’t want to spend a lot of money, we have just the solution for you. With some basic tools and supplies, you can easily convert a mini fridge into your own kegerator. Follow these simple instructions, and in no time at all, you will be enjoying a cold draft beer right from your home bar. I hope this article has helped you learn How To Make A Kegerator Out Of A Mini Fridge? If you have any additional questions, please feel free to reach out to us for assistance. Thanks for reading! Cheers!
If you want more information to refer to phoenixlandingbar.com
