How to Setup a Kegerator? Step By Step Simple And Effective
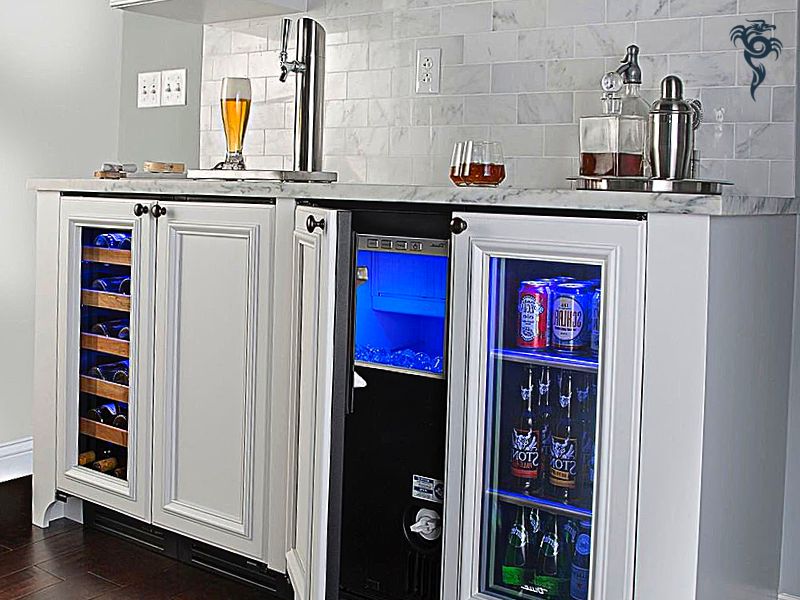
How to Setup a Kegerator? A kegerator is a great addition to any home bar, and it’s not as difficult to set up as you might think. The most important factors are making sure everything is clean (no dirt or old beer deposits) and sealing up any air leaks. Ices in your area, as well as the beer lines themselves. After that, it’s simply a matter of filling the tank with CO2, attaching it to your keg, and chilling it all down to serving temperature. In no time at all, you’ll be enjoying a fresh draft beer in the comfort of your own home! In this post, we’ll walk you through everything you need to know to get your kegerator up and running. We’ll cover everything from choosing the right location for your kegerator to assembling it and tapping your first keg. By the end of this post, you’ll be ready to enjoy a fresh, cold draft beer in the comfort of your own home. So let’s get started!
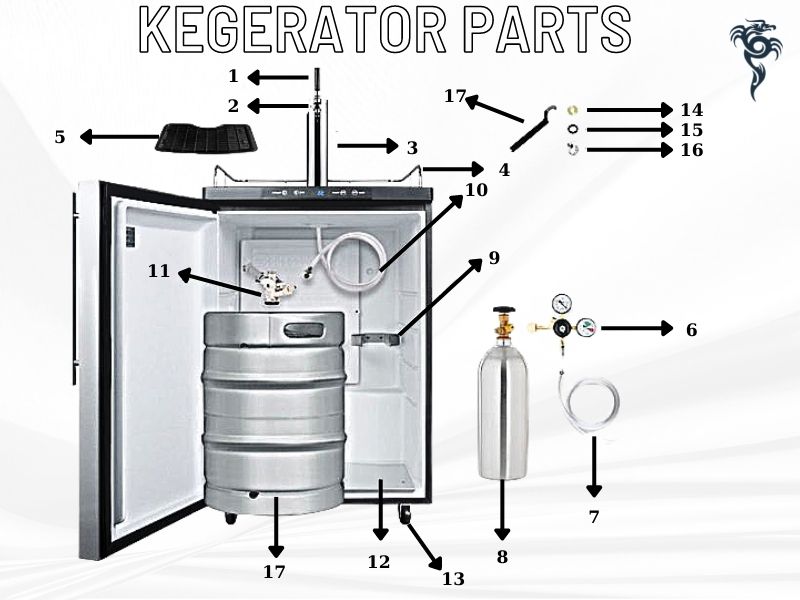
Kegerator Parts
1. Faucet Handle
2. Faucet
3. Beer Tower
4. Guard Rail
5. Drip Tray (not pictured)
6. Double Gauge Regulator
7. Air Line - 5/16″ ID
8. CO2 Air Tank
9. Air Tank Holder
10. Tower Beer Line - 3/16″ ID
11. Keg Coupler
12. Metal Keg Floor Support
13. Casters (optional)
14. Nylon Washer
15. Rubber Washers
16. Screw Clamps
17. Spanner Wrench
18. Half Keg (not included)
Tools You’ll Need
The kegerator is an essential part of your home bar, so you’ll want to have all the necessary tools on hand for setup. The spanner wrench and hex nut wrenches will help install the lid or side panels if needed; CO2 air tank nuts can be used when setting up gas lines, and having one handy around just in case any leaks occur while filling up! Other than these necessities, remember that rubber washers go near locations where two metal pieces come together, such as connecting ports between sections within this type of equipment. Screw clamps hold both beer taps AND bottles securely without letting liquid escape, which would make things messy fast (don’t forget about those!). Nylon washers should also be used when connecting certain lines, such as the airline, to keep a snug, solidified grip that will help prevent leaks.
Summary
1. Drill
2. Level
3. Tape Measure
4. Hex Nut Wrenches (5/16″ and 3/8″)
5. Screw Clamps (3/16″ and 5/16″)
6. Nylon Washers (5/16″ ID, 3/8″ OD)
7. Rubber Washers (5/16″ ID, 3/8″ OD)
8. CO2 Air Tank Wrench or Valve Opener (not pictured)
9. Spanner Wrench (not pictured)
10. C-clamps (optional, not pictured)
Getting Started
1. Choose a location for your kegerator. It should be in a cool, dry place out of direct sunlight. If you’re planning on moving it around often, make sure the floor is level and that there’s enough clearance for the door to open fully.
2. Assemble the kegerator according to the instructions in the manual. Make sure all nuts and bolts are tight and that there are no sharp edges inside the unit.
3. Install the drip tray by attaching it to the underside of the beer tower with the screws provided.
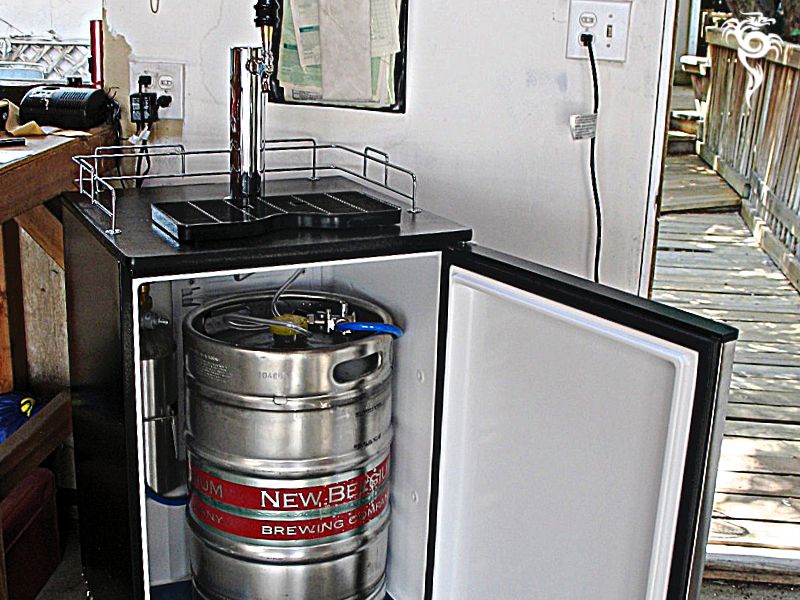
4. Place the keg on its side and roll it into position next to the kegerator.
5. Position the beer tower on top of the keg, making sure that the drip tray is lined up with the opening in top of the keg.
6. Attach the CO2 tank to the regulator using the black knurled knob. Hand-tighten only; do not use tools.
7. Connect one end of the airline to the regulator and the other to the keg coupler’s gas inlet. Make sure all connections are tight.
8. Connect one end of the beer line to the outlet on the keg coupler and run it through the hole in the drip tray. Cut it to length so that it reaches just below the spout of the beer tower, then attach the other end to the inlet on the beer tower. Again, make sure all connections are tight.
9. Open the valve on the CO2 tank and slowly turn up the pressure until it is between 10 and 12 PSI. Check for leaks at all connections.
10. Once the pressure is stabilized, open the relief valve on the keg coupler to release any air that may be trapped in the line. Close the valve when the beer starts to flow from the coupler.
11. Install the faucet by threading it into the hole in the front of the beer tower. Make sure it is tight so that there are no leaks.
12. Place a glass under the faucet and open it to pour your first beer!
How To Setup A Kegerator?
There are a few things you should do before you start setting up your kegerator: First, choose the location for your kegerator. It should be in a cool, dry place away from direct sunlight. A basement or garage is a good choice. Besides, having a keg of beer in your kitchen might not be the best way to keep your significant other happy.
Unpackage The Kegerator
Once you get your kegerator delivered, remove all of its shipping packagings and let it stand upright for at least 24 hours before plugging in. After that’s done (and if necessary), move the fridge or other coolers into their final location and install them on a level surface-make sure there is adequate ventilation around both units per manufacturer instructions! Once you have selected the perfect location, it is time to unpackage your kegerator. If you have purchased a used one, make sure all the parts are there before you start setting it up.
1. Remove all the packaging from your kegerator.
2. Check that all the parts are there and in good condition.
3. If you are missing any parts or if any of the parts are damaged, contact the manufacturer for replacement parts.
Install Top Railing
The top rail of this refrigerator is designed to snap on with ease, so you won’t need any tools. There are holes at the bottom where it meets your kegerator for easy mounting and removal!

Install Drip Tray
The drip tray is an essential part of any kegerator as it catches spills and overflow from your tap! It also makes cleanup a breeze-no more mopping up after every party!
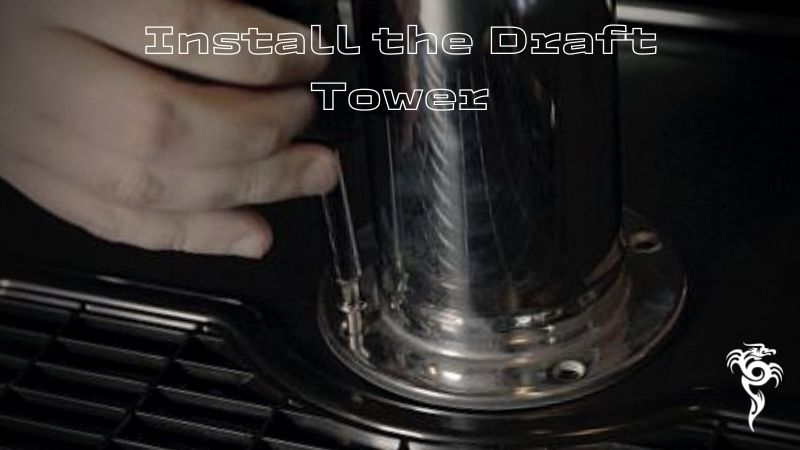
Install The Draft Tower
When you receive your kegerator, there will be a plug covering the hole where our draft tower goes.. It can simply be removed by hand or with any flathead screwdriver to install one on top of an existing fridge-vending system in someone’s home! Align these circular gasket holes up against their counterpart spots near but not touching them (you’ll want at least 2 inches separation), feed vinyl tubing through the opening then fasten everything together using screws from below— Make sure they’re all tightened securely before continuing along). If you’re unsure whether or not your alignment is correct, don’t hesitate to ask a friend for help or measure out the distance with a ruler.
Secure Tower
The next step is to take the four bolts that come with your kegerator kit and use them to secure the draft tower to the fridge. It’s important that you do this correctly, as an improper installation could result in leaks. Be sure to hand-tighten only; no tools should be used in order to avoid stripping the threads.
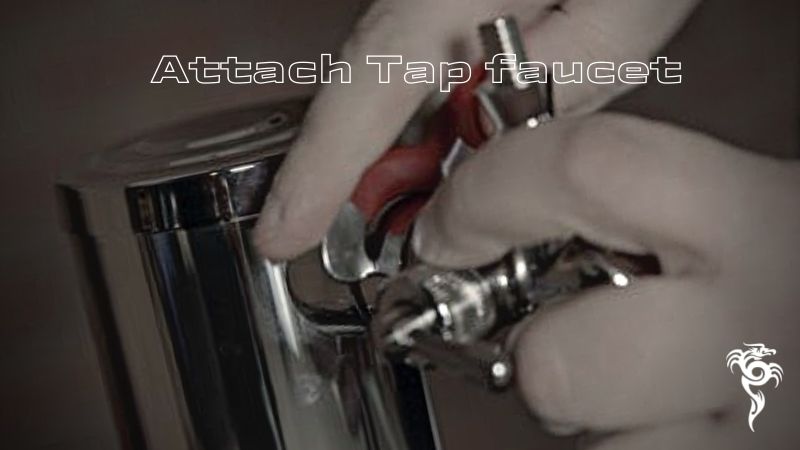
Attach Tap Faucet
Here’s how to make sure your tap connections are tight and leak-free. First, use a spanner wrench (or large adjustable pliers) on either side of the faucet until they fit snuggly into their respective holes for you not to have any leaks while pouring beer from one glass into another or making adjustments during parties with different kinds of drinkers! The next step would be determining what type suits best - flow control valves come standard, but if that isn’t enough then there is also the option that allows slower pour rates so no more overfoaminess.
Attach Tap Handle
After the faucet is installed, it’s time to attach the tap handle. This is a pretty straightforward process; simply screw it on until it’s tight. Be careful not to over-tighten, as this could damage the threads. Tap handles make for a great way to personalize your kegerator. You can screw them in from the bottom or install them so they face whichever direction you want while still being able to use them as an ordinary faucet! Tap handle designs come with black plastic ones that are included at no extra charge, but if you want to be creative, and create a unique brand for your kegerator, then you should go to places that specialize in customizing these faucet handles.

Connect Tube Beer Line To Keg Coupler
Now it’s time to connect the beer line to the keg coupler. The tubing should fit snugly over the Barb, and you can use a clamp to secure it in place if needed. When you connect your beer line to the keg coupler, ensure a rubber washer between them. Attach it firmly before screwing on any metal pieces so as not to have an incorrect connection which might cause flooding in your home!

Attach One End Of Tube Air Line To Regulator
Now you need to attach one end of the airline to the regulator. The Barb should fit snugly over the tubing, and you can use a clamp to secure it if needed. Attaching one end of the airline to your CO2 regulator is important so you can make sure everything works out properly. The pictured part, which has an output Barb and also happens to have shut-off valves on both ends (in case something goes wrong), will attach securely with screws once they’re installed-although we recommend using Clamp Style connectors for best results since this type provides superior seals without worrying about leaks during transport!
It may seem like there are many types or versions when compared side; however, these just become more specific as needed depending on the application. For example, a Dual Gauge regulator will have two pressure readings: one for the amount of CO2 in the tank and another for output pressure. This is standard on most home units, while a single-gauge only has an output reading.
Connect Opposite End Of Air Line To Keg Coupler
Place the hose end of your keg coupler into place so that you can attach it to either a gas regulator or another similar device. The next time you get a keg, be sure to attach an airline and prevent any leaks with these simple steps. Attaching one end of your beer lines should already have been done when getting the empty container, so this is just another step in making sure that it will stay sealed while holding pressure inside! Use screws or clamps according to what works best for securing connects only during each procedure- there aren’t really too many variables here, but some people like using different tools depending upon their preference about how much force needs applying at certain points, etcetera.
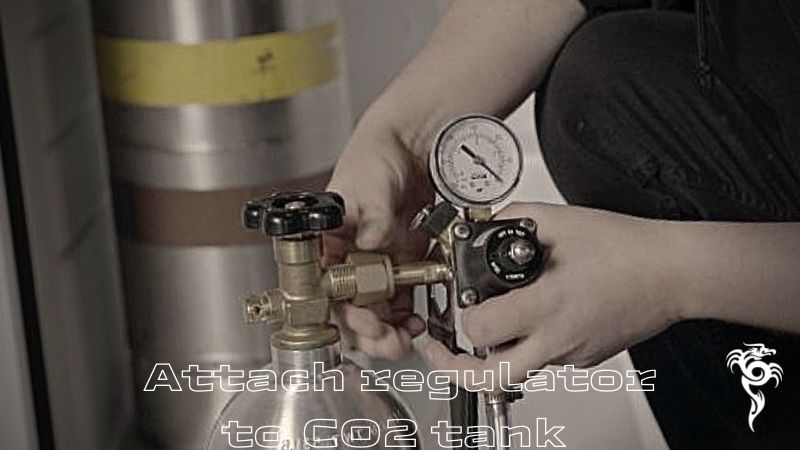
Attach Regulator To CO2 Tank By CO2 Inlet Nut
When you’re ready to put your newly full CO2 tank into use, start by attaching the regulator to the CGA-320 inlet nut. Hand-tighten the connection until it’s snug, then use a wrench to give it an extra 1/4 turn. Don’t over-tighten, as this could damage the threads or cause a gas leak.
Now that you’ve attached your regulator, it’s time to set the pressure. Most home units will have a knob or lever that allows you to adjust the output pressure. For beer, you’ll want to set it around 12-14 PSI. Keep in mind that the temperature of your keg will affect the pressure, so you may need to make adjustments as needed.
Attach Coupler To Keg
To begin pouring your perfect beer, attach the coupler of choice to each end and screw them in with ease. The handle should face upwards or diagonally while fitting into place atop an empty keg (oriented accordingly). Once locked securely below the surface level, you can push down on it until all four handles are facing more straight out than in an agonal position - this will allow some liquid flow through the vinyl line at least one way!
Open Up The Air Tank
The first step of opening up your compressed air tank and pumping CO2 through the system is turning a hand wheel to engage it while moving an output barb facing downward or parallel with where you’ll be connecting pipes from. You should hear bubbles coming out when this part turns on! The second thing needed for proper operation must also happen at some point during setup- make sure that there isn’t any debris clogging either end by cleaning thoroughly before proceeding further along their inspection path; otherwise, these could cause problems later down the road if not dealt.
Adjust The Regulator To Proper PSI Level - Calibrate Regulator
It’s important to set your regulator to the proper PSI level before you start using it. Most home units will have a knob or lever that allows you to adjust the output pressure. For beer, you’ll want to set it around 12-14 PSI.At this point, you can stop adjusting the regulator and start using your keg. Keep in mind that the temperature of your keg will affect the pressure, so you may need to make adjustments as needed.

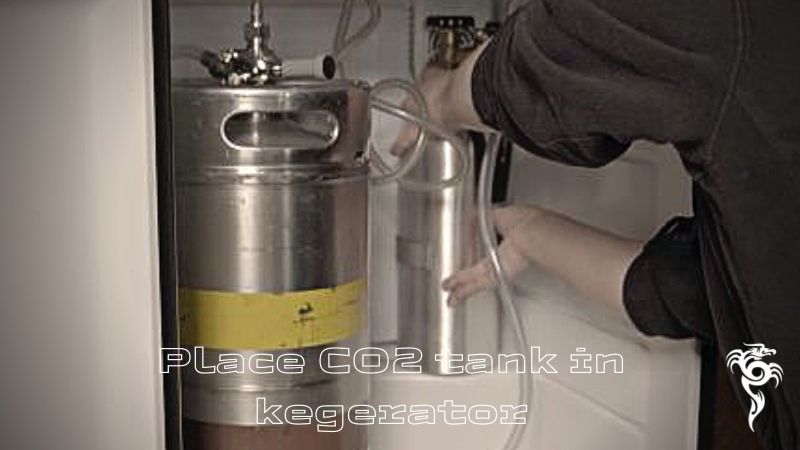
Place CO2 Tank In Kegerator Carefully
To avoid any accidents, be sure to handle the CO2 tank with care and place it in a spot where it will not tip over. The kegerator refrigerator typically includes an air tank holder either outside or inside of your fridge so that you can secure this highly pressurized gas cylinder properly while storing them away from children who might playfully toss around their toys at times when they should really focus on what’s happening right now- playing hard!
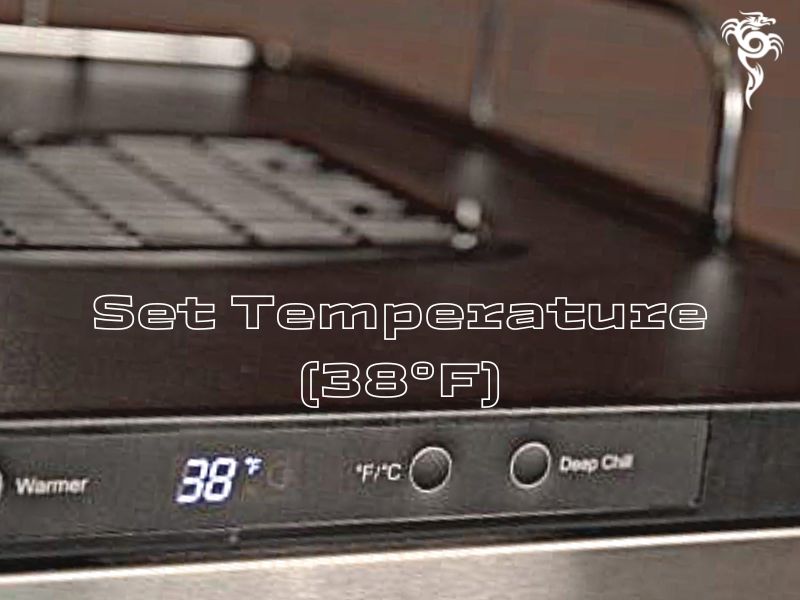
Set Temperature
Now that you’ve placed your CO2 tank in the kegerator, it’s time to set the temperature. If you want to avoid foamy pours, then set your kegerator at a temperature between 36° and 40 degrees Fahrenheit - the ideal temperature for serving beer. Adjust the thermostat until it reaches the desired temperature, then let the keg sit for a few hours to reach equilibrium.
Enjoy! Pour Delicious Beer, Cheer!
Now that you’ve followed all the steps, it’s time to sit back and enjoy a cold beer. Start by opening the tap, then grab a glass and hold it at an angle as you pour. The beer should have a slight foam head, but if it’s too foamy, then you may need to adjust the pressure or temperature.
Now, you’re reading “How to Setup a Kegerator?” of Phoenix Landing Bar. Keep reading!
How To Build Your Own Kegerator And Install It In Your Countertop?
Gather Your Supplies
To build your own kegerator, you’ll need a few supplies. First, you’ll need a fridge or freezer that’s big enough to hold a keg. You’ll also need a CO2 tank and regulator, beer lines, a coupler, and a tap. You can find all of these supplies at your local homebrew shop.
If you’re going to build your kegerator into your countertop, you’ll also need a hole saw and drill. Make sure the fridge or freezer you select is small enough to fit into the space you have available.
Prep Your Countertop
Before you begin, you’ll need to prep your countertop. First, use the hole saw to cut a hole in the countertop for the tap. The size of the hole will depend on the size of the tap you’re using.
Next, use the drill to make two holes in the back of the fridge or freezer. These holes will be used to run the beer lines.
Prep Your Fridge
Now it’s time to prep your fridge or freezer. First, remove the shelves from the fridge or freezer. You’ll need to make room for the keg.
Next, use a drill to make two holes in the back of the fridge or freezer. These holes will be used to run the beer lines.
If you’re using a fridge, you’ll also need to remove the door. Most fridges have a hinge that allows you to do this.
Install The Fan
If you’re using a fridge, you’ll need to install a fan. This will help to circulate the air and keep the beer at the proper temperature.
To install the fan, first, remove the light bulb from the fridge. Next, use a drill to make two holes in the back of the fridge. These holes should be big enough to fit the fan.
Finally, insert the fan into the holes and secure it with screws.
Install The Keg
Now it’s time to install the keg. First, remove the cap from the keg. Next, use a drill to make two holes in the top of the fridge or freezer. These holes should be big enough to fit the taps.
Finally, insert the taps into the holes and secure them with screws.
Install The Tap
Now it’s time to install the tap. First, remove the cap from the keg. Next, use a drill to make a hole in the countertop for the tap. The size of the hole will depend on the size of the tap you’re using.
Finally, insert the tap into the hole and secure it with screws.
Enjoy!
Now that you’ve followed all the steps, it’s time to sit back and enjoy a cold beer. Start by opening the tap, then grab a glass and hold it at an angle as you pour. The beer should have a slight foam head, but if it’s too foamy, then you may need to adjust the pressure or temperature.
Cheers!
Now, you’re reading “How to Setup a Kegerator?” of Phoenix Landing Bar. Keep reading!
How To Clean Your Kegerator And Beer Lines?
Cleaning your kegerator and beer lines is important to avoid off flavors in your beer. Begin by disconnecting the gas and beer lines from the keg. Next, remove the tap from the countertop and disassemble it.
Soak all of the parts in a solution of warm water and brewing cleaner. Finally, reassemble the tap and reconnect the gas and beer lines.
Turn on the gas and let it run for a few minutes to flush out the lines. Then, open the tap and let the beer flow until it’s clear.
Finally, turn off the gas and disconnect the lines again. Soak all of the parts in a solution of warm water and brewing cleaner. Allow everything to air dry before reassembling the tap and reconnecting the gas and beer lines.
How to choose the right kegerator for your needs
When choosing a kegerator, you’ll need to consider several factors, such as the type of beer you want to dispense, the amount of beer you want to store, and the space you have available.
If you only want to dispense one type of beer, then a single-tap kegerator will be sufficient.
However, if you want to dispense multiple types of beer, then you’ll need a multi-tap kegerator.
The size of the kegerator will also be important. If you only want to dispense a small amount of beer, then a compact kegerator will be sufficient. However, if you want to dispense large quantities of beer, then you’ll need a full-size kegerator.
Finally, you’ll need to consider the space you have available. If you have limited space, then you’ll need a compact or portable kegerator. However, if you have plenty of space, then you can choose from a variety of sizes and styles.
Besides, don’t forget to buy some essential accessories, such as a CO2 tank, regulator, air hoses, and fittings. With these basic components, you’ll be able to dispense beer from your kegerator.
Recipes for some popular types of beer that can be made and using a kegerator to store beer
Pale Ale:
1.5 lb. light dry malt extract
1 lb. pale malt
1/2 lb. crystal malt
1 oz. Cascade hops (bittering)
1 oz. Willamette hops (finishing)
Wyeast 1056 American Ale yeast
Directions:
Steep the crystal malt in 2 gallons of water at 155 degrees F for 30 minutes. Remove the grains and add the light dry malt extract, stirring to dissolve. Bring to a boil and add the Cascade hops. Boil for 60 minutes, then add the Willamette hops and boil for another 5 minutes. Remove from heat and cool to 80 degrees F before adding the yeast. Ferment at 68 degrees F for 2 weeks.
Porter:
1 lb. light dry malt extract
1 lb. dark malt
1/2 lb. chocolate malt
1/4 lb. black patent malt
1 oz. Cascade hops (bittering)
1 oz. Willamette hops (finishing)
Wyeast 1084 Irish Ale yeast
Directions:
Steep the chocolate malt and black patent malt in 2 gallons of water at 155 degrees F for 30 minutes. Remove the grains and add the light dry malt extract, stirring to dissolve. Bring to a boil and add the Cascade hops. Boil for 60 minutes, then add the Willamette hops and boil for another 5 minutes.
Remove from heat and cool to 80 degrees F before adding the yeast. Ferment at 68 degrees F for 2 weeks.
Stout:
1 lb. light dry malt extract
1 lb. dark malt
1/2 lb. roasted barley
1/4 lb. black patent malt
1 oz. Cascade hops (bittering)
1 oz. Willamette hops (finishing)
Wyeast 1084 Irish Ale yeast
Directions: Steep the roasted barley and black patent malt in 2 gallons of water at 155 degrees F for 30 minutes. Remove the grains and add the light dry malt extract, stirring to dissolve. Bring to a boil and add the Cascade hops. Boil for 60 minutes, then add the Willamette hops and boil for another 5 minutes.
Remove from heat and cool to 80 degrees F before adding the yeast. Ferment at 68 degrees F for 2 weeks.
Now, you’re reading “How to Setup a Kegerator?” of Phoenix Landing Bar. Keep reading!
FAQs
How long must a keg sit in the cooler before tapping?
It depends on the size of your cooler. A full-size keg should sit in the cooler for 24 hours, while a pony keg should sit for 12 hours.
Can I store my keg outside?
No, you should never store your keg in an unrefrigerated area, as this will cause the beer to spoil.
How long does beer stay fresh in a keg?
If stored properly, beer will stay fresh in a keg for 2-3 months. After that, the quality of the beer will start to decline.
What is the best way to clean my keg?
The best way to clean your keg is to use a commercial keg cleaner or a homebrewer’s keg washer. You can also clean your keg by hand, but this is a more time-consuming process.
Can I use my kegerator to dispense soda?
Yes, you can use your kegerator to dispense soda, but you’ll need to purchase a separate CO2 tank and regulator for this purpose.
Why is my kegerator so foamy?
If your kegerator is foamy, it is likely due to a dirty draft line. Cleaning your draft lines regularly will help to prevent this problem.
Do I need CO2 for a keg?
Yes, you will need CO2 to dispense beer from a keg. CO2 is used to push the beer from the keg and into your glass.
Conclusion
If you are in the market for a kegerator or just want to learn more about it, check out our comprehensive guide on How To Setup A Kegerator. We’ve included everything from choosing the suitable model for your needs to installing and setting up your new beer dispenser. And, of course, we wouldn’t leave you hanging without some delicious recipes to get you started. So what are you waiting for? Share this post with your friends and neighbors, and start enjoying a draft beer at home today!
If you want more information to refer to phoenixlandingbar.com